First, for this exercise, you can close any windows in Squeak by pressing on the 'X' on the title bar, or minimise them by pressing on the 'O'. Once you've cleared a little space, click on the Squeak desktop to bring up the 'World Menu':
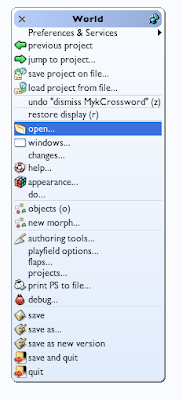
Clicking on the 'open' item brings up a useful menu showing lots of interesting tools that you can open. It's worth coming back to this menu to investigate all these tools, but for now we're interested in opening a 'system browser', so click on that:

This brings up the system browser; most of your code creation and editing will happen here. It has lots of powerful features - try right-clicking on the various panes to get an idea of the functionality it exposes. The left-hand pane shows 'Categories' (kind of like packages or modules in other languages). Clicking on a category shows all the classes in that category.
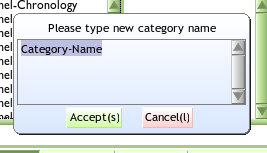
Let's create a new category for our code to go into. Right-click on the categories pane (the left-hand pane) to bring up its menu, then click on 'create category...':

This brings up a 'Fill-In-The-Blank' menu, which waits for you to enter a value:
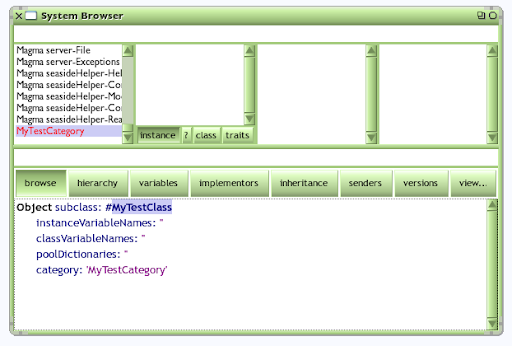
Here, I've entered 'MyTestCategory':
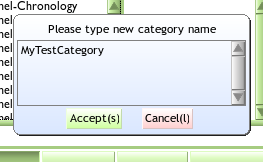
Clicking the Accept button will commit this name (the (s) on that button indicates that pressing (Ctl-s will have the same effect). You will then see that your new category has been added at the bottom of the Categories pane (if a category with that name already existed, you'll be shown that category and its contents - it's best to avoid adding classes into pre-existing categories until you know what you're doing).
The large 'code pane' at the bottom of the window has also been pre-populated with a 'class creation template':
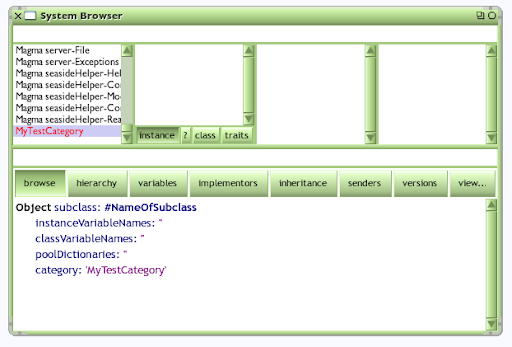
Editing this pane will allow us to create a new class and define its instance- and class- variables. For the moment, let's just create a simple class; leave the template unchanged except for replacing NameOfSubclass with the name of the class you want to create. Note that this means that your new class will be a subclass of Object, with no instance or class variables, created in the 'MyTestCategory' category:
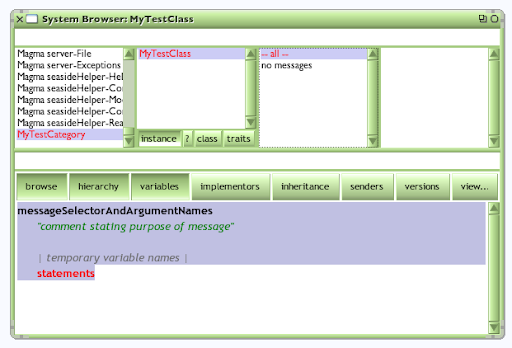
Pressing Ctl-s will accept this change. If you've picked a name that is already used in Squeak, you will get an error message, and you should cancel and try again. Once you've settled on a unique name, you will see your new class appear in the classes pane. Make sure that the 'instance' button is selected (the other buttons show class comments; class methods; and any traits of the class -- all beyond the scope of this simple introduction):

You can now add a method to your class by clicking on '--all--' in the messages pane (a 'message' being the Squeak equivalent of a 'method' in other languages). This brings up a 'new method template' in the code pane, which shows the four key elements of a method definition: its name, a comment, its local variables, and some code statements (as below). If your code pane doesn't look like this, try clicking on '--all--' again -- editing before this text has appeared means that you're not editing method text, and you will get an error when you try to save.
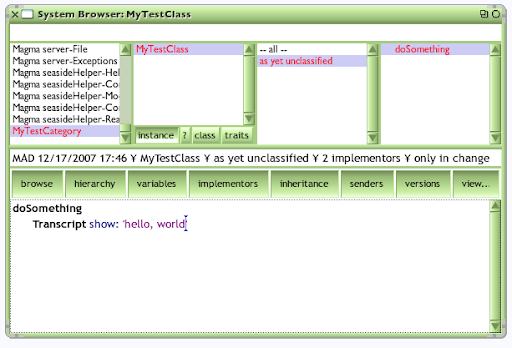
Replace the template code with your own code. The code below defines a method called 'doSomething' that will print out a helpful and informative message on something called the Transcript. Press Ctl-s to accept the code, and you will see the method appear in the methods pane on the right-hand side. The third pane allows you to organise your methods into useful groupings, but as we've not done this, our method is identified as being 'as yet unclassified':
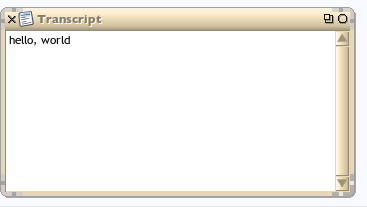
Let's make a Transcript window for our output. Open the World menu, select the Open sub-menu and click on transcript, and a Transcript window will appear:
A Transcript is a simple logging window, often used to capture debugging information, and is where our class will send its output:
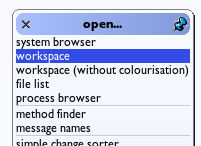
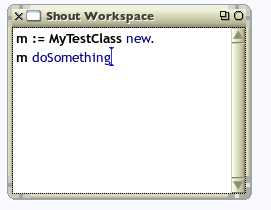
Now we want to call our class' method. First create a workspace, which is where you can execute Squeak code:
We can now create a new instance of your class, by sending the message 'new' to the class, and hold the resulting instance in the variable 'm'. Note the final '.' which is Squeak's statement separator. Press ctl-d (to Do-it):

To call the method on our new instance, type in 'm doSomething' and then ctl-d to execute it:
And there you go; you've created a class, created an instance of that class, and sent a message to that class, resulting in some visible output:
You might like to open the World menu again, and click on 'save' to keep hold of this valuable code.